Emergency Roof Protection: How to Install a Roof Tarp After Storm Damage
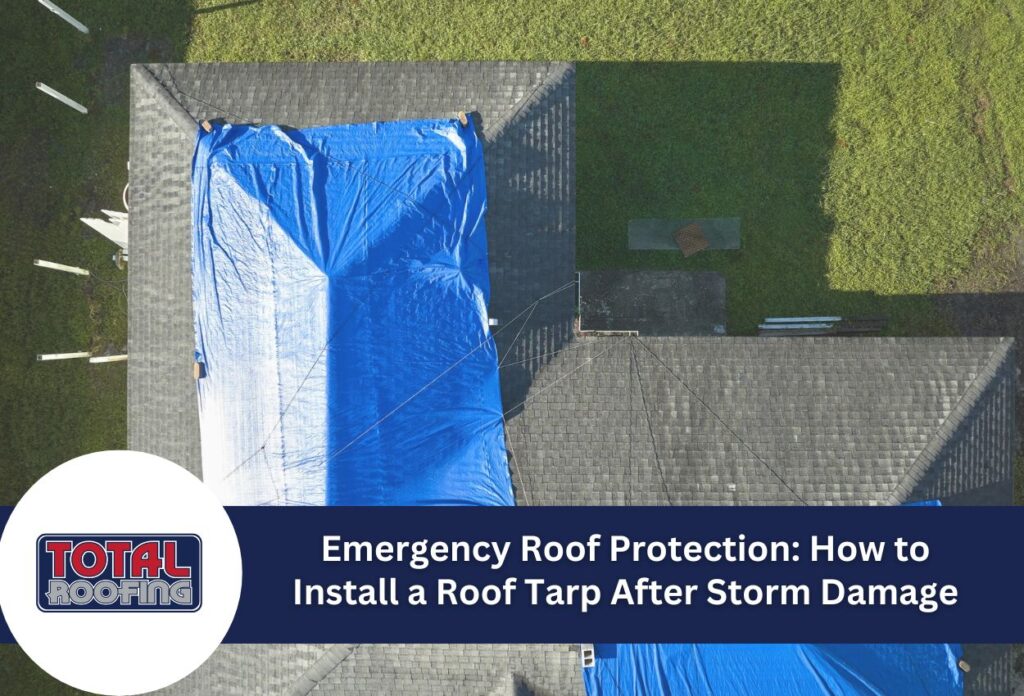
When severe storms strike the St. Louis area, roof damage can quickly turn into a household emergency. Installing a roof tarp provides critical temporary protection that prevents further damage to your home’s interior while you wait for professional repairs. A properly secured tarp acts as a barrier against rain, wind, and debris, protecting your ceiling, insulation, and belongings from water damage that could lead to mold growth and structural issues.
Emergency roof tarp installation isn’t complicated, but it requires careful preparation and specific techniques to ensure the temporary covering stays in place during subsequent bad weather. With the right materials and approach, homeowners can shield their damaged roof until a qualified St. Louis roofing contractor completes repairs.
Before attempting DIY roof tarp installation for storm damage, safety must be your top priority. Damaged roofs present hazardous conditions beyond those of routine roof work, and assessing both the roof’s condition and weather forecasts before beginning is essential. This temporary roof protection can save thousands in additional repairs when done correctly, creating a secure barrier that keeps water out of vulnerable areas where shingles or roofing materials have been compromised.
Supplies Needed for Successful Roof Tarp Installation
Gathering the right supplies before starting your temporary roof protection project ensures a successful installation that will withstand St. Louis weather conditions until professional repairs can be completed. For effective emergency roof tarp installation, you’ll need a heavy-duty tarp that’s at least 6 mil thick. Select a tarp that is larger than the damaged area — some common sizes range from 20-by-30 feet for smaller damage to 30-by-40 feet for larger affected areas.
Tools include a ladder with stabilizers, a safety harness, a hammer, roofing nails, wooden furring strips, a utility knife, measuring tape, and safety gear like gloves, non-slip shoes, and safety glasses. For securing the tarp, you’ll need enough wooden strips to create a frame around the perimeter and across the middle of the covered area.
If you’re dealing with an emergency situation without access to all professional tools, several household alternatives can work effectively. Deck screws can substitute for roofing nails, while rope or bungee cords can temporarily replace wooden strips in a pinch. Bricks or sandbags can help weigh down tarps when climbing onto the roof isn’t safe. For cutting materials, heavy-duty scissors can replace a utility knife when necessary.
Step-by-Step Roof Tarp Installation Process
Before installing a temporary roof tarp, accurate measurements are crucial. Start by measuring the damaged roof area from the peak to at least 4 feet beyond the lowest point of damage. Add an extra 4 feet on all sides to ensure adequate coverage and proper water runoff. For typical St. Louis homes with storm damage, allowing the tarp to overhang at the eaves provides optimal protection against our region’s heavy rains and strong winds.
Once your measurements are complete, position your tarp starting at the roof peak. Carefully unfold it downward over the damaged section, keeping it as smooth as possible to prevent water pooling. Create a slight slope away from the roof peak to direct water toward the gutters. Secure the top edge of the tarp by wrapping it around a wooden furring strip and nailing the strip to the roof peak. This prevents water from seeping under the tarp.
Continue securing the sides and bottom edge with additional furring strips, placing them approximately every 8 to 10 inches. For enhanced security during severe weather, add strips across the middle of the tarp in an “X” pattern. Avoid pulling the tarp too tight, as a slight looseness allows for expansion during temperature changes. After installation, inspect the entire perimeter to ensure no edges are loose or flapping, which could compromise your temporary roof protection during St. Louis’ storm season.
Securing Your Tarp Against St. Louis’s Weather
St. Louis’ mix of high winds, thunderstorms, heavy rainfall, and temperature changes can test even securely installed roof tarps. When anchoring your emergency roof tarp, the sandwich board technique provides superior security — place one wooden strip on top of the tarp and another directly underneath, then secure them together with screws or nails every 8 to 10 inches. This distributes pressure evenly and prevents the tarp from tearing at attachment points.
For optimal wind resistance in our region, secure the tarp not just at the edges but also with additional anchor points in a grid pattern across the covered area. During summer thunderstorm season, reinforce corners with additional wooden strips arranged in an “X” formation. When placing screws or nails, position them at a slight upward angle to resist uplifting winds that commonly accompany St. Louis storm fronts.
Consider installing water diverters above the tarped area to channel heavy rainfall away from vulnerable sections. For winter protection, create small peaks in the tarp surface to prevent snow accumulation, as wet snow can add significant weight. Many St. Louis homeowners also add rope securing points midway down steep roof pitches for additional reinforcement. These measures ensure your temporary roof protection remains intact until professional repairs can be completed.
Common Roof Tarp Installation Mistakes to Avoid
Even with the best intentions, homeowners often make critical errors when installing emergency roof tarps that can compromise protection and lead to further damage. One frequent mistake is selecting a tarp that’s too small for the damaged area, leaving vulnerable sections exposed to rainfall. Always ensure your tarp extends at least 4 feet beyond all sides of the damaged section to provide adequate coverage and proper water runoff.
Insufficient securing methods present another common problem. Simply weighing down a tarp with bricks or using too few attachment points will likely fail during the first significant wind event. Similarly, using regular household nails instead of roofing nails or screws can quickly pull out, especially during typical St. Louis thunderstorms with strong gusts.
Improper placement often leads to water pooling, which adds weight and stress to your roof structure. After installation, inspect your tarp carefully for low spots or depressions where water might collect. Check that all edges are completely secured with no gaps that could allow wind underneath. Look for potential friction points where the tarp might rub against rough surfaces like chimney corners or vent pipes, which can cause tears over time.
If you notice issues after installation, such as flapping edges or water seepage, address them immediately by adding more securing points or adjusting the tarp position. While DIY installation provides temporary protection, remember that a professional roofing contractor should assess and repair the underlying damage as soon as possible.
Maintaining Your Temporary Roof Tarp
Once your emergency roof tarp is installed, regular checks are essential to ensure it continues providing effective protection until permanent repairs can be completed. Inspect your temporary roof protection at least twice a month and after every significant weather event. Look closely at all securing points, checking for loose nails or screws that may have worked themselves free. Examine the entire tarp surface for tears, punctures, or areas where the material has started to degrade from UV exposure.
During fall, remove leaves and branches that accumulate on the tarp, as this debris can trap moisture and add unnecessary weight. After heavy rainfall, address any water pooling immediately by adjusting the tarp position or adding drainage solutions. Before winter storms, clear snow accumulation promptly to prevent ice dams and excess weight on your roof structure.
Watch for warning signs that your DIY roof tarp installation needs attention, including flapping edges, water stains on interior ceilings, or visible sagging in the tarp. If you notice the tarp has shifted position or securing points have failed, reinforce these areas immediately with additional wooden strips and fasteners. While temporary roof tarps can effectively protect your home for several weeks, they shouldn’t be considered a long-term solution. Schedule professional roof repairs as soon as possible to prevent the need for more extensive restoration work.
When to Call a Professional Tarping Services in St. Louis
While DIY roof tarp installation can provide temporary protection, most situations require professional help. If your roof has a steep pitch, attempting to install a tarp yourself is especially risky. Professionals have the necessary equipment on hand and years of experience working safely on steep slopes. Similarly, extensive damage covering large sections of your roof may be beyond DIY capabilities, as proper protection requires precise installation techniques that experienced contractors have mastered.
Weather conditions also factor into this decision. During active storms, high winds, or when lightning is present, it’s never safe to attempt roof work. Ice or snow accumulation creates extremely hazardous conditions that professionals are better equipped to handle. Additionally, if structural damage is suspected, indicated by sagging roof sections or cracked rafters, only a professional should assess and address these serious issues.
Professional roofing contractors in St. Louis offer emergency tarp services with significant advantages over DIY solutions. They provide industrial-grade tarps and securing systems designed to withstand harsh weather conditions for extended periods. Most reputable St. Louis roofing companies maintain 24/7 emergency response teams during storm season and can quickly assess damage while documenting everything needed for insurance claims. When searching for emergency assistance, look for contractors with specific experience in storm damage and temporary protection who can seamlessly transition from emergency tarping to permanent roof repairs once weather permits.
Secure Your Home with Professional Tarp Installation from Total Roofing
If you’re facing roof damage after a storm in St. Louis, don’t hesitate to call Total Roofing. Proper tarp installation is crucial to prevent further damage to your home, and doing it incorrectly can lead to more serious issues down the line. Total Roofing offers expert emergency tarp installation services to ensure your home is protected against further weather damage efficiently and safely.
Our team is equipped with the right tools and expertise to handle any roofing situation, including urgent post-storm scenarios. We understand the specific challenges posed by St. Louis’ weather conditions and are prepared to respond swiftly to your needs. Call us at (618) 719-6767 for immediate, professional assistance. Let Total Roofing help secure your home effectively with a correctly installed roof tarp.